This past weekend I started the process of transforming the cabinets with the Rustoleum Cabinet Transformations Kit. Saturday I removed all the upper cabinet doors, removed the hinges and door knobs, filled the holes where the knobs currently were on the door, scraped off the rubber thing that keeps the door from hitting the frame and then numbered the doors with painters tape along with baggies containing the door hinges.


I also washed down the frames and doors with soap and water. Finally it was time to start using stuff from the Rustoleum Cabinet Transformations Kit. First up, the Deglosser, this product removes the glossy sheen from the cabinets and allows proper adhesion of the bond coat. This is the most important step and so you don’t want to screw it up. No pressure or anything.

Trying to photograph things while wearing giant green rubber gloves is hard work and makes for some crappy photos. Sorry. While I was busy doing that, the hubby was outside building a play set for the kids so he couldn’t be the photographer. More on our backyard later this week.

After deglossing for maybe half an hour my fingers would lock up and I would freak out and throw the green scrubby to unlock them. Sunday I stared at the big pile of cabinet doors and figured I better get working on them. I might have been feeling slightly guilty for not helping build the play set. Plus I was hosting my MOPS table chickas for spa and craft night Monday night.
Using some big green gloves and a green scrubby that comes in the kit, you pour some deglosser on your scrubby and then go to town on the cabinet frames and doors.

Sunday afternoon I decided to finish the dreaded task of deglossing the cabinets. My fingers had finally unlocked themselves so I thought why not try it again?
When deglossing I was paranoid I wasn’t scrubbing hard enough or using enough of the deglosser. Here is how mine looked when I would use it, kind of soapy looking.

After applying the deglosser you then wipe your cabinet off with a damp lint free rag, following up with a dry lint free rag. Then you flip over your cabinet and do the same to the back of it, removing the piece of tape first, then when it’s all dry place the tape back on the cabinet door. After applying deglosser to all my kitchen cabinet doors it was time to degloss the kitchen cabinet frames.
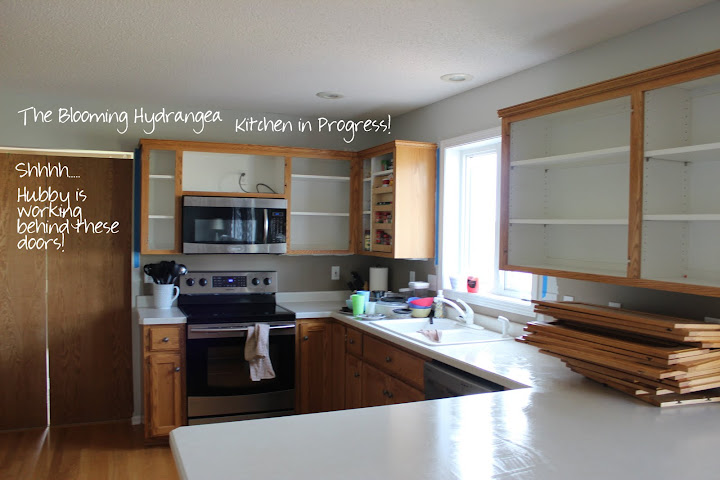
This was my least favorite part so far and I still need to do this to the bottom cabinet doors and frames. For right now I need to focus on the upper cabinets. Today I’m deciding if I will go white, gray or a combination of both. The next step is applying the bond coat, finally I can start some painting! Here is what the kitchen looks like, dirty dishes and all right now. I tried to remove whatever I could from the cabinets. The spice rack is staying put and I didn’t want to remove all the spices, they seem to be just fine in their little jail cells.
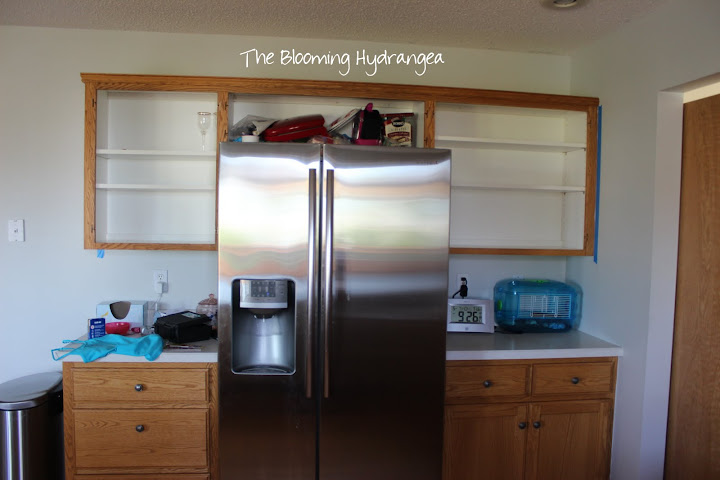
On a side note, hubby is trying out his office in the old dining room area. We rigged up some fancy door system as you can see in the picture above. Those oak doors are still being used in our house. He really likes not living like a mole in the bunker basement office, the dining room has two windows and carpeting. That’s another project in the queue that we will accomplish sometime this decade year.

Perhaps we should end this post with a photo of a pretty kitchen so you will come back?

Ah, much better! I’ll be back later this week to share the progress in the backyard. We are going to be installing a pool in our yard along with the play set. The kids will be quite happy this summer to never leave the yard! (Well at least that’s my hope!)
i haven’t used
that brand
but when i painted my cabinets
i started with deglossing
and it worked very well
it will be worth it in the end
and i will read all 2000 posts
if it means i’ll get to see
the finished result!
alison
Hang in there. I know your grey and white ktchen with the open or glassed cabinet doors will be beautiful. When your kitchen is done, you will sit back and think what a clever person you are to have done this by yourself. And you better post a lot of pictures so we can ooooo and aaahh
Wow, that made me tired just reading it! That’s a LOT of work!!
OH! You are doing so well! Keep going and you will have a beautiful space that you’ll be able to enjoy (and warn the rest of us never to try doing ;).
I have started the staging in our house. The painting over my personal colors part, so I get the fingers locking up part, but add sore glutes and shoulders to that. Yikes.
You have lots of energy!
Did I tell you that I used to be a MOPS coordinator, too?
Hard job, but so rewarding!
Keep going, girl!!
Love, me
i can’t wait to see how this all goes!
Don’t work your fingers off now girl!
It all takes time… bet it’s going to be so pretty =)
Look forward to seeing it.
Shannon
So exciting to see the progress!! It will look great when it’s all finished up – can’t wait to see it!
How exciting, Ange!! Can’t wait to see this project progress!!
We’re all there with you in spirit! 🙂 It’s going to be worth every single minute of your hard work!
Keep a picture of that inspiration in front of you at all times! That was by far the hardest project that I tackled in my house so far (and I used the kit) so keep your head up! A year later, my cabinets look great and I’ve forgotten all the horrible times during the process (though you are reminding me quite vividly) 🙂
Oh my friend!!! Wowee that is a big job but I know it will all be worth it in the end….which is easy for me to say right now since I’m not the one doing all of that deglossing. LOL! I seriously love the idea of gray on the bottom and white on the top but anything you decide will look bee-u-ti-ful! 🙂
Vanessa
P.S. LOVED your last post and I want my hubby and I to take the quiz again since it has been forever since we took it the first time!
Keep rockin’ and rollin’!!! I can’t wait to see the end results!!!!
Whew, that is a lot of work!! Go girl! Can’t wait to see the transformation!
Wow, this sounds like a terrible job. haha. 🙂 But at least the end result will be incredible!
Wow, you are a busy woman. I can’t wait to see what color you pick. We painted the cabinets at our first house and even though it was quite the process, I loved the outcome. Your kitchen is going to ROCK and so his the playset!!
I sure hear you on how much work it is, been there done it, so worth it though! I can’t wait to see what color you chose to do the cabinets in!
Looks like a lot of work… But it will be so worth it in the end! Can’t wait to see the finished results!
Looking good! I can’t wait to see the transformation!! I’m a little jealous…I want to paint our kitchen SO bad, but we rent. I am trying to work up the guts to ask the homeowner. Maybe after I “watch” you go through it I’ll feel like a pro and have the confidence to ask!