Hi, Blooming Hyrdrangea readers!
Ange asked me to stop by today
and share one of my favorite tutorials with you.
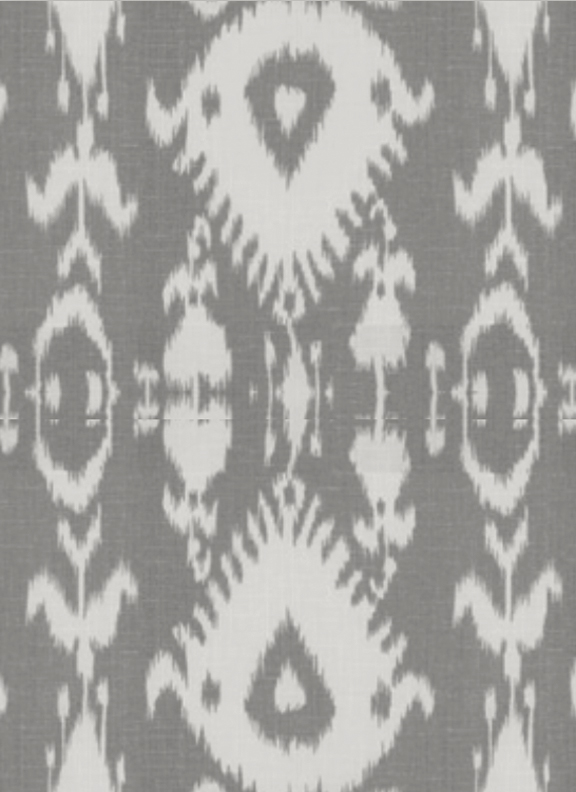
I scoured the internet and finally found one that I loved, the Malabar print from Ballard Designs… the price wasn’t even bad for an ikat fabric. Unfortunately, it was on back order until JULY and I could not wait that long….so I decided to make my own.

This is how I did it:
1. Create an Ikat stencil in photoshop.
To do this, I cut and pasted this photo of Malabar Ikat from Ballard Designs into photoshop.

In photoshop, I created a seamless pattern out of this design and sized it 8 x 11. This made it large and easy to work with.
2. Print the pattern .
I created an 8×11 printable for you. Click here.
When you are finished cutting the stencil out, it will not look exactly like this pattern,
this is just a guideline.
3. Trace the pattern onto stencil sheet with thin permanent marker.
If I had to do it over again, I would buy the largest sheet I could find and trace the stencil onto it filling the sheet. This would make the stenciling process alot easier.
This stage is where your stencil becomes your own. I had to alter the Malabar pattern to make it work as a stencil. I had to make sure all of the individual pieces of the pattern were connected so the stencil would be successful.
4. Cut out stencil.
This tool is a lifesaver for cutting out stencils, I think I paid $7.00 at Hobby Lobby, definitely worth it!

I wanted to make the background of my fabric coral. To do this I cut out the gray areas of the stencil. If you wanted to make the ikat coral cut out the white of the stencil.
1. Select Fabric.
I used a cream linen for my fabric. I was very pleased with how the stencil and Simply Screen paint worked on the linen.
2. Iron fabric, lay it flat on a piece of posterboard (something you do not mind getting paint on) and tightly tape the fabric to the board.

3. Paint
I decided to try Simply Screen, screen printing paint, after seeing these incredible DIY pillows by Cyndy on The Exchange.
She had me sold when she said “when the screen print paint dries, it is just like fabric and doesn’t look “painted” on.” I hate crunchy paint on fabric!
I mixed a custom color using Simply Screen Firetruck, Orange Peel and a little white to cut saturation and make the color less intense.
Cyndy was right, this paint is AMAZING! When you mix it, it becomes an inky goo more like ink than paint. It does not bleed, and there is no variation of color when you put it on the fabric. Best of all it is not crunchy when it dries.
Before I started stenciling, I rubbed stencil adhesive onto the stencil, especially around the edges to keep it tight to the fabric.

Wow, this is a looong tutorial. Bear with me the fun is just beginning, it is time to stencil your fabric!
1. Lay your stencil straight onto your fabric.
I used a T-square throughout the process to keep the stencil straight.

2-5.
2. Paint, use a lot of paint, make sure the fabric is wet.
3. Move stencil vertically, lining your stencil up with the portion you just painted. Make sure to keep the stencil straight.
4. Paint
5. Move the stencil horizontally to the first panel you painted. Overlap the first area you painted, to make the transition seamless.

I had to use the stencil to paint two rows vertically and four columns horizontally to fill approximately 3/4 a yard.
This is why I recommend using a larger stencil sheet, so I would not have had to overlap the stencil as often.


I couldn’t put my beautiful NEW ikat fabric on my old, beat up chairs…so I gave them a fresh coat of Dover White Gloss spray paint.


After I finished this project, Design Sponge asked if I would be interested in making pillows and creating a tutorial for their site. Of course I said yes!
The first time I did the project, I used a linen fabric. The second time through I used a cotton duck. I much prefer stenciling on the linen, however, both worked well.
Here are the pillows:


Thank you for having me today Ange!
Thank you Elizabeth for your great tutorial and for sharing it here today! Stay tuned for the next guest blogger, Rene from Cottage and Vine!

This is seriously one of the most brilliant ideas ever…I'm even more impressed after seeing the whole arduous process! Major kudos points for patience, it paid off!!! (c: What a fun blog you have here Ange! Looking forward to more fun here!
What a cute design, I absolutely love this pattern. Thanks Ange for having Elizabeth from the Mustard Ceiling show us how to make the stencil.
i am so impressed that she made her own fabric! i totally would have bought some and recovered the chairs.
That is awesome!